Contrast stretch. I moved the top-right triangle to a place near the top of the pixel brightness distribution.
Does your DSLR need cooling?
Vendors try hard to convince us that DSLRs need cooling for astrophotography. Is this really true? It depends on the temperature and sky brightness of your imaging environment, and the imaging setup. Here is a simple experiment that can answer this question for you.
Basic concept and method
To test this, we need to take two dark frames and two on-sky exposures (called "light frames" by some) under similar conditions. We subtract the two dark frames by each other, and subtract the two on-sky exposures by each other. The subtraction removes all fixed patterns in the images, such as those produced by the readout structure of the camera, the hot and cold pixels, sky background, and celestial objects. What's left would be anything that randomly changes between the pairs of exposures, ie, noise. Because it changes between exposures and does not have a fixed pattern, it cannot be removed by any dark subtraction or bias subtraction. Therefore it is the true noise in the image.
The noise in the subtracted images can be readout noise, dark noise, and photon noise from the sky background. In a subtracted dark exposure pair, it contains both the readout noise and dark noise. In the subtracted on-sky exposure pair, it contains all the three noises. However, if our sky is not totally dark (this is impossible even in the outer space) and if the dark current from the camera is low enough, the sky photon noise can become stronger than the dark noise in some cases. The sky photon noise is the noise that we can never escape from. We stack many long exposures in order to beat down the photon noise to detect faint celestial objects. Since the photon noise is the noise we will always have, as long as it is substantially stronger than the dark noise, the effect of dark noise becomes negligible and cooling is not needed. This is just like if we are swimming in a pool and surrounded by large amount of water (photon noise), we don't care about a few rain drops (dark noise) on our head.
The experiment below is to find out which one is stronger, dark noise or photon noise?
Procedures
1. Imaging
First, we need to take at least two on-sky exposures, two dark exposures, and one (better three) bias. The setup should be identical to what we usually use for imaging, including optics, environment, focus, exposure time, etc. The telescope/lens need to be focused first. Then we can warm up the camera, by taking series of dark exposures of whatever the exposure time we normally use. Depending on the camera, the warm up time can be anywhere between 10 and 30 minutes. After the warm-up, we take two additional dark frames for our experiment, and then point the telescope to a place with as few stars as possible and take two on-sky exposures. We should use identical exposure times and ISO setting, and also avoid rapid temperature change. Then we can cover the telescope again and take a few bias frames with the shortest possible exposure time. It goes without saying that we should use full-resolution, uncompressed raw files.
2. File conversion
You can skip this section if you already know how to use DCRAW (or equivalent raw converters) to linearly convert raw files into 16-bit TIFF files. Directly using DCRAW is better, but probably not easy for most people. Here I provide an alternative method.
Here we will use DeepSkyStacker (DSS), a free software for stacking deep-sky images. Make sure you download the latest version. In DSS, load all the two dark images and on-sky images as picture files (do not use the loading dark file function). Then load one bias image as bias. In the "Raw/FITS DDP Settings" window, select bilinear interpolation for RAW files. This way, DSS will subtract the bias from all the other four images and produce TIFF images. In the "Intermediate Files" tab in the stacking setting window, check the "Create a calibrated file..." option and the "Save a debayerd image..." option, and TIFF files as the file format. This way, DSS will subtract the bias and convert the four raw files to 16-bit TIFF files. The bias subtraction is not necessary in principle, but only by doing so will DSS write the TIFF files we want. The effect of the bias subtraction will be canceled later after we subtract the dark and on-sky images with each other. So the bias used here is just a dummy image.
Once the above is done, we can click "check all" and then "Register checked pictures." It is not necessary to ask DSS to stack the images.
3. Photoshop processing
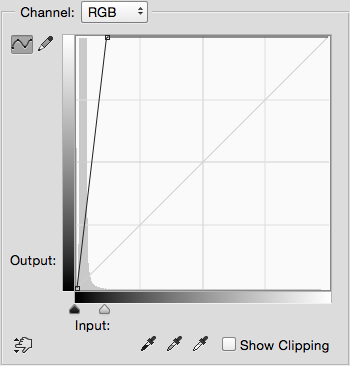
Now we should have two dark images and two on-sky images, as 16-bit TIFF. We can load the four images to Photoshop (or equivalent software). At this stage, the four images usually look very dark in Photoshop. We can apply an initial contrast stretch for us to better see what are there. Below is what I did to one of the on-sky images to enhance its contrast with the Curves function.
Contrast stretch. I moved the top-right triangle to a place near the top of the pixel brightness distribution.
Note that here we should only move the top-right triangle inward, horizontally. We should never add a third control point, as this will destroy the linearity in the data. We should apply the same contrast stretch to all four images. We can use Photoshop's action function to quickly apply the same curve to all images.
Now we can subtract the two dark images with each other, and subtract the two on-sky images with each other. This can be done with Photoshop's Apply Image function. Because the subtraction will almost move all pixels to zero, we artificially add an offset to the subtracted images to recover all the negative values. This is done with the following setup in the Apply Image window:
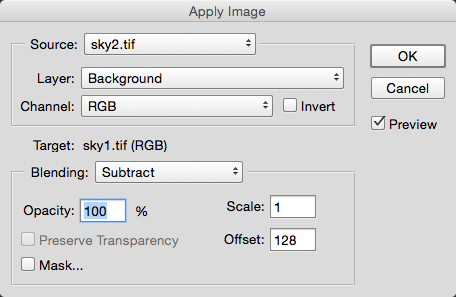
Subtract the two images with each other using Apply Image. Note the offset of 128.
After the subtraction and offset, we should see two images (one dark1 - dark2, and the other sky1 - sky2) that appear gray and overall featureless. However, if we look carefully, we see that most pixel do not have brightness of exactly 128. There is subtle noise and perhaps other features. To see this clearly, we can apply another contrast stretch. Here is what I did to the subtracted on-sky image:
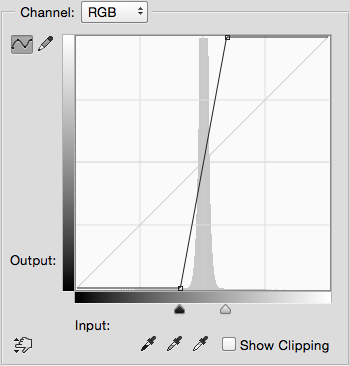
Contrast stretch to enhance the subtracted sky and dark images. The positions of the two triangles should be symmetric about the middle point (128).
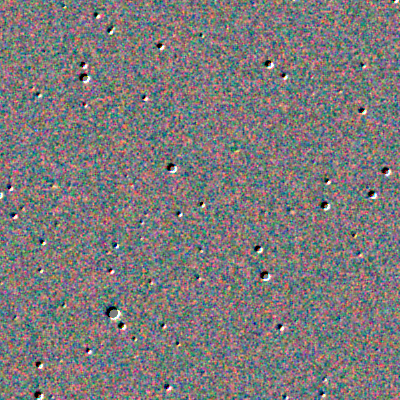
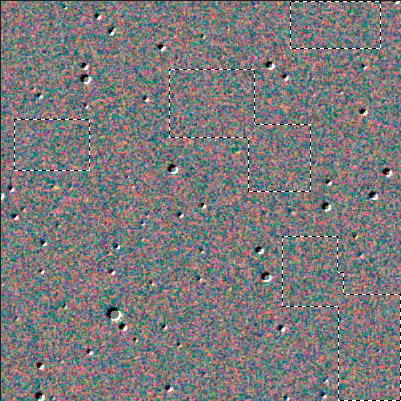
Again, we should only move the two triangles horizontally without adding any more control points to maintain the data linearity. We should apply the same stretch to the subtracted on-sky image and the subtracted dark image. Below are central crops of my subtracted images after the contrast stretch.
dark1 - dark2 |
sky1 - sky2 |
 |
 |
Std Dev = 5.71 (8.20, 3.72, 4.12) |
Std Dev = 32.35 (44.88, 26.22, 20.83) |
The noise fluctuation in the above subtracted dark image is dark noise of the sensor. The amount of noise is roughly 1.4 times higher than that in one image. We can also see a few dark and very bright pixels. Those are caused by the noise in hot pixels, which is stronger than the noise in normal pixels.
4. Measurements
In the above subtracted on-sky image, we see that stars are not perfectly subtracted, because there is a small tracking offset between the two images. If the EQ mount is guided, we should be able to subtract the stars better. Additional to the residue from stars, we see lot of noise in the image background. This is the photon noise from the sky (plus dark and readout noise). Again the amount of photon noise in this two-image subtraction is roughly 1.4 times stronger than that in a single image. Here we can immediately see that in this example, photon noise is much stronger than dark noise. To be more qualitative, we can use Photoshop's histogram window to get noise values. To do so, we need to first select regions that are free of star residue. We don't want the positive and negative subtraction artifacts to skew the statistics. Below is the area I selected in Photoshop:
Selecting clean areas that do not have the stellar subtraction artifacts.
Here I try to select regions that are as clean as possible. Image background areas that do not contain obvious star subtraction artifacts may still contain fainter artifacts caused by very faint objects. This is not avoidable unless our tracking is very accurate. However, by carefully selecting clean areas, we can minimize this effect. Also, we should only select regions that are close to each other, to avoid effects caused by large-scale sky gradient. Here I limit the selections to be within the central 400x400 pixels of my image.
Once the selection is done, we can go to Photoshop's Histogram window and get the statistics.

Photoshop's histogram window. Note the "Std Dev" value.
In the histogram window, we should pay attention to the "Std Dev" value, which stands for "standard deviation" and is a measure of the amount of brightness fluctuation across the pixels (ie, noise). The value displayed there only accounts for pixels in our selected area. We can also go to the Channels window to select individual RGB channels and measure their standard deviations. We should measure standard deviations from the same selected pixel areas in the subtracted dark and on-sky images. This can be achieved with copying the subtracted dark image and pasting it to the subtracted on-sky image to form a second layer, and then making the selection in the on-sky layer. The results measured from my subtracted dark and on-sky images are listed below the associated images displayed above.
5. Analyses
We can do the analyses on each of the RGB channels separately. For simplicity, here I just use the RGB combined values. In the subtracted dark and on-sky images, the standard deviations are 5.71 and 32.35, respectively. This confirms what we see---the noise in the sky background is much higher than the dark noise.
Precisely speaking, the noise we measured from the sky background (32.35) also contains the contribution from the dark and readout noise. (The noise measured from the dark image contains both the dark and readout noise.) We can subtract the dark+readout noise (5.71) from the sky background measurement (32.35) to get pure photon noise. This subtraction is not a direct subtraction, since noises add quadratically, ie, noise1+2 = sqrt(noise1^2 + noise2^2). (^2 means square, and sqrt() means square-root.) Therefore, the pure sky noise is sqrt(32.35^2 - 5.71^2) = 31.85.
What the above calculation says is that, by adding an amount of 5.71 of dark+readout noise to the photon noise of 31.85, the final noise level is 32.35. In other words, the impact of dark+readout noise to the sky photon noise is only 1.57% in this example. To compensate this 1.57% loss of signal-to-noise ratio, we only need to increase our total exposure time by 3.16% (1.0157^2 = 1.0316), which is nothing. Practically, we will not be able to see a 1.57% difference in noise level in amateur astrophotography unless we carry out very careful analyses. In other words, we will not see any practical difference in terms of image quality and depth even if we completely eliminate the dark noise and readout noise. Our image quality is completely determined by the sky photon noise in this example, and cooling the camera does not bring any noticeable improvement.
Discussion
It is worthwhile to tell you my imaging setup. The above example pictures were taken with an F3.8 astrograph (Vixen VSD100) and a modified Nikon D800 (with a software hack to disable some annoying raw processing made by Nikon), at the Maunakea Visitor Information Center (roughly 3000 m above sea level) with an ambient temperature of roughly 2 deg C. Nikon D800 has a very low dark current (measured to be 0.925 e-/sec/pixel at 25.4 deg C ambient, and 0.032 e-/sec/pixel at 6 deg C ambient). The low ambient temperature further helps to suppress dark current. On the other hand, the sky above Maunakea is exceptionally dark. The dark sky (low sky photon noise) potentially increases the demand for very low dark current in order to fully exploit the darkness. However, we see in the above analyses that dark noise is totally negligible in the final image. (It is not negligible in the dark image, but is negligible in the real on-sky exposures.) The dark noise even cannot make any impact to the very low sky noise. In this imaging setup and environment, there is absolutely no need for active cooling for the DSLR.
Now, not everybody images under a 2 deg C temperature, so my results may not apply to you. For example, if the environment is 20 deg C warmer, the dark current would increase by roughly 30 times, and therefore the dark noise would increase by roughly 5 to 6 times (dark noise is square-root of dark current, when measured in electron unit). In the above example, if the 5.71 dark+readout noise is totally dominated by dark noise and if the dark noise increases by 6 times, it will become comparable to or even larger than the sky photon noise (31.85). If this is the case, then cooling will be very useful for suppressing dark noise and enhancing image quality. (Of course, the 5.71 dark+readout noise is not just dark, but also contains contribution from readout noise. We can take two more bias exposures and subtract them with each other to quantitatively determine the strength of readout noise.) On the other hand, most people who image from warm areas are those who image in their own backyard, and the sky there is usually not too dark. This increases the sky photon noise, and we may be still in the regime where sky photon noise is much higher than the dark noise. If this is the case, then again, we don't need active cooling. You can carry out your own analyses using the above procedures to find out the answer for you.
In my example above, although I conclude that I totally don't need cooling, I still need to carry out careful dark subtraction, in order to remove the fixed pattern (dark current) in the images. This includes taking enough numbers of dark frames, and make the temperature of the dark exposures as close to the on-sky exposures as possible. To archive these, I always closely monitor and record the ambient temperature when I image, and I maintain a dark library that contains many darks taken under various temperatures. I rely on softwares (DeepSkyStacker or PixInsight) that can optimally adjust the dark subtraction to compensate any potential small differences between the temperatures of the dark and on-sky exposures. I also dither my on-sky images, so any small residual effect in the dark subtraction will be offset from each other and averaged out after the stacking. Only after doing all the above (which I do anyway, even if I cool my camera), I can safely claim that my camera does not need cooling.
Finally, it is also interesting to take two more bias exposures and subtract them from each other to see the strength of readout noise. By comparing the standard deviations in the subtracted bias exposures (readout noise) and the subtracted on-sky exposures (readout+dark+photon noise), we can get an idea about whether our single-frame exposure time is long enough. If the readout noise is not negligible comparing to the total noise, then we need to increase the exposure time of each single exposure. Under the same total exposure time, this can enhance our image quality.